
Learn Git & Github - 2
Learn Github: Lesson-2
Difference between git and github
In the first lesson we learned how git works, Now we will see what is github. People often get confused between git and github. These two are entirely different things providing the same functionality. The major difference between git and github is that git works on your machine and github is a cloud service. You can see github as a cloud version of github where an entire team can work on a project. So there is not a point of choosing either one of them. You use git only if you have a project on which you are working alone and then you use github along with git if you are handling a team project. Its not mandatory to have a team to use github. If you want to share your code to people then you can push/upload it to github also. Don't worry about getting it changed by developers because the project will be in your hands and you will be the person to choose which changes should your project accept.
Getting started with Github
Lets see how can we use github. There are 2 reasons to get to github.
- Either you want to work on an existing github project
- You want to start your own project and want to share it with the world.
Work on existing github project
So we'll consider the first reason first. Suppose you want to work on an existing project. Then you'll definitely have your desired project url but in case you haven't decided yet then you can go to this Fetch-info Github Tutorial repository (Open it in a new tab so you can go along). Every project uploaded on github is called a repository. Now when you have opened the wep page. The first thing to do is "Fork the project" by clicking a button "Fork" on right side in the top See Image. When you fork a project, github creates a copy of that project under your account which you can modify anytime but those changes won't reflect in the original project.
Lets assume that you have forked the project and now the code url will be something like https://github.com/your-username/fetch-info-github.Now check a text field containing a link aside a button "Download Zip" See Image. Copy the link from the field. Its the link from which you can download that project on your machine. Downloading a project is called cloning in github terminology.
Once you have copied the link, open your terminal/git-bash on your machine and go the directory where you want to download your project. Now type git clone your-link. Now git will download the project along with the edit history of that project which means all of its commits history. Go to your forked project webpage and see a drop-down menu in left with label "branch" See Image. If you click it then you will see that there are more than one branch. One branch being the master and other being alpha if you have forked my dummy repository. Now go back to terminal and change your directory to your project name which git downloaded.
Once inside the directory, type git branch. You will notice that there is only one branch "master". Its advantageous becuase all other branches are normally either for testing or development. The branch which matters is "master". So you have your project set up on your machine. You can type git log to see what commits have been happened. This is just set up. Main development on that project will continue later when we'll be discussing about git commands so sit tight. Also these steps are for people who want to contribute to existing projects. Those who want to create a new project read the next section.

Creating a new project on github
Creating a new project on github is not a difficult task to do. Just click the "+" button on the top right corner of the webpage aside your "profile pic" See Image. There you will be presented with many options but we'll click "New Repository" because we want to create a project. When you will click the "New Repository" button, a page will open which will ask for project name. Enter the name which doesn't exist earlier. Now add description of your project. Public repositories is our option because we haven't paid for the private service. Now if you want a Readme file in your project which will contain the description then click "Initialise with Readme". Choosing a licence is very important if you are doing some series development. Here is something which can help you Choose License But if you are doing some basic development then you can choose MIT license which distribute your project for research purposes.
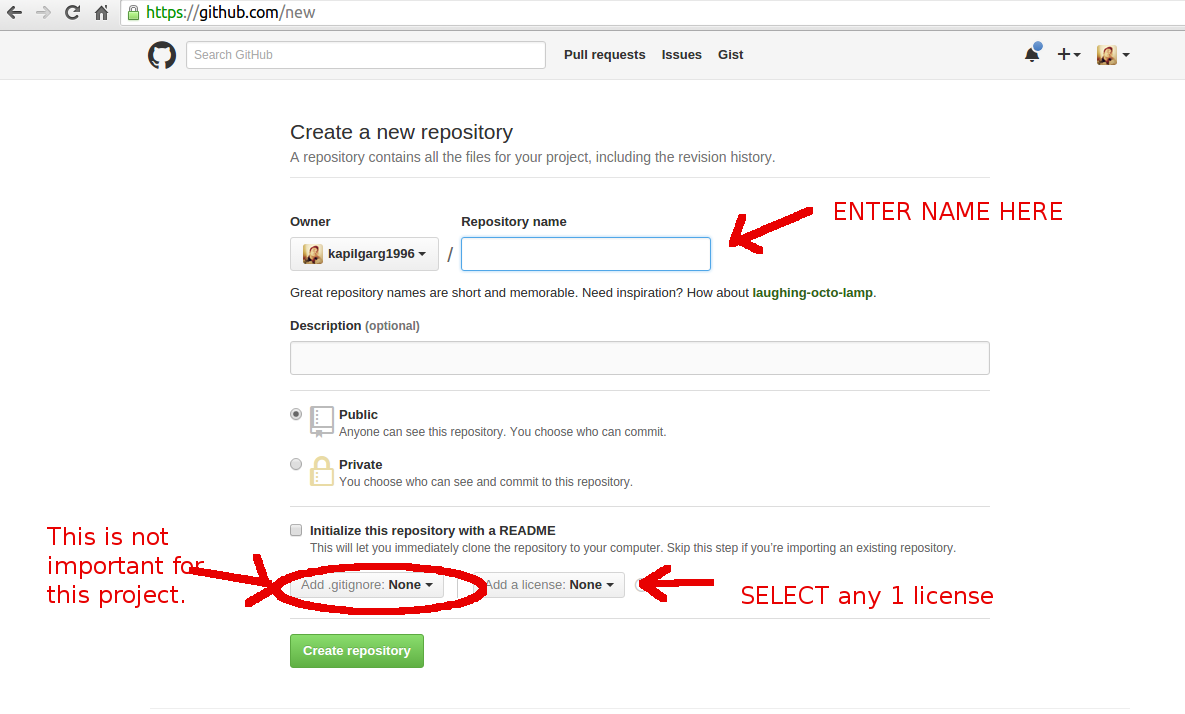
When you have done all this then click "Create Repository". Then you will have your project. Now check a text field containing a link aside a button "Download Zip". Copy the link from the field. Its the link from which you can download that project on your machine. Downloading a project is called cloning in github terminology.
Once you have copied the link, open your terminal/git-bash on your machine and go the directory where you want to download your project. Now type git clone your-link. Now git will download the project along with the edit history of that project which means all of its commits history. This is just set up. Main development on that project will continue later when we'll be discussing about git commands so keep following this guide.
Okay folks. Now you have set up your project. In the next lesson, we will study some basic git commands and will use them to develop our project further.


Comments
Post a Comment
Comment on articles for more info.